Pro recovery video guide · 3:32 · audio and subtitles in English, German, French and Traditional Chinese (Settings → Audio Track)
The written steps below follow the video. Only need to decrypt clips that are still on the drive? That is free — watch the batch decryption guide instead.
ClipSalvage recovers deleted Tesla Dashcam and Sentry Mode footage from the car's USB drive on a Mac or Windows PC: it opens the drive read-only, shows available thumbnails and previews free, and exports the clips you choose to a different drive. Take the drive out of the car first, because later writes can replace deleted footage and overwritten footage can't be recreated. This guide explains why Tesla videos get lost and how recovery works, then walks you through it step by step.
How to recover deleted Tesla dashcam footage with ClipSalvage
- Stop using the USB drive. Take it out of the car and don't copy anything onto it.
- Install ClipSalvage on a Mac (macOS 14 or later, Apple Silicon) or a Windows 10 or 11 PC.
- Scan the drive with ClipSalvage. The app opens the Tesla USB drive read-only.
- Preview what ClipSalvage found. Available thumbnails and recovery assessments are free.
- Export the clips you need with ClipSalvage to a folder on a different drive.
- Check the exported footage and back it up before you erase the USB drive or put it back in the car.
The full walkthrough with screenshots is further down.
Why do Tesla dashcam clips get lost?
Short answer: the video is usually still there, even when your computer says it isn't. Here are the four things that typically go wrong.
Tesla vehicles continuously record video to a USB drive — 6 cameras on AI4/HW4 cars (front, back, left repeater, right repeater, left pillar, and right pillar) or 4 on older AI3/HW3 cars (no pillar cameras). For the storage layout and folder structure see how Tesla stores video on USB drives. There are four common scenarios that cause this footage to disappear, the most common of which is Sentry events vanishing before the driver gets to them.
 Accidental formatting
Footage may still be recoverable after a format if video data remains. A quick format can leave data behind, but recovery is not guaranteed. Stop using the drive and save recovered clips to another drive. Repaired containers, timing and estimated camera labels may differ from the original files; check the exported footage.
 File system corruption
Tesla writes video clips continuously while driving, and if the drive is removed while the car is still writing (or during a power event), the file system can become corrupted. The drive may appear empty, show errors, or become unreadable by your computer, but the video data is still physically present on the drive's storage chips.
 Automatic overwriting
Tesla's dashcam system automatically deletes the oldest clips when the drive runs low on space. If you did not save a clip before it was overwritten by newer footage, it may be partially or fully recoverable depending on how much new data was written after deletion.
 Drive failure or read errors
USB flash drives can develop bad sectors over time, especially under the constant write cycles from Tesla's continuous recording. If you already have a disk image, you can open it instead. Keep the original drive untouched.
How does file carving work?
In plain terms: deleted files aren't really gone. Recovery tools just find them again.
When you delete a file on a USB drive, the operating system does not erase the actual video data. Instead, it simply marks the space as "available" in the file system's directory table. The video data stays exactly where it was until new data is written over those same physical sectors.
File carving takes advantage of this by scanning the raw storage sectors of the drive -- ignoring the file system entirely -- and looking for recognizable file signatures. Tesla Sentry Mode and Dashcam videos are MP4 files, and every MP4 file starts with a specific byte sequence called the ftyp atom. A carving tool reads through the drive sector by sector, identifies these signatures, and reconstructs the files. For a deeper walkthrough, see file carving explained for Tesla owners.
Two related background reads: what formatting actually does to Tesla dashcam data and how long Tesla footage stays recoverable after formatting. To set a drive up for the car, see how to format a USB drive for Tesla Dashcam and Sentry Mode.
ClipSalvage improves on basic carving with several Tesla-specific optimizations:

Cluster-aligned scanning
On an exFAT drive with 128 KB clusters (131,072 bytes), files begin at cluster boundaries. ClipSalvage checks for MP4 signatures at cluster boundaries. Scan time depends on the drive and its connection.

MP4 structure validation
When a potential file is found, the scanner parses its internal structure (ftyp, mdat, and moov atoms) to verify it is a valid video file, determine its exact size, and extract metadata like creation date and video resolution. It validates against known MP4 brands (isom, iso2, mp41, mp42, avc1, M4V) and checks for Tesla-specific video dimensions: 1280x960, 1280x720, and 1920x1080.
Confidence scoring (0-100 scale)
Each recovered file is scored from 0 to 100 based on seven factors: MP4 header validity, video data presence, metadata integrity, timestamp plausibility, file size range, cluster alignment, and Tesla-specific video dimensions. Scores of 85-100 indicate the file should play back without visible problems, though a score cannot guarantee this. Scores of 40-64 mean the video may have gaps or artifacts. This tells you upfront which clips will be usable.

Filename recovery from directory entries
The scanner also reads deleted directory entries from the exFAT or FAT32 file system. When these entries have not been overwritten, original Tesla filenames (with date, time, and camera position) can be restored. This enables identification of every camera position on both hardware generations: the 6 of an AI4/HW4 car (front, back, left repeater, right repeater, left pillar, and right pillar) or the 4 of an AI3/HW3 car (no pillar cameras).
What each confidence score means
The score is the engine’s own estimate of how intact a carved file is, before you spend a recovery on it. It is composed of seven weighted factors — MP4 header (ftyp) validity, video data (mdat) presence, metadata (moov) integrity, timestamp plausibility (Tesla era, 2018–present), file size range (typical 15–75 MB), cluster alignment, and a bonus for Tesla-specific frame dimensions (1280×960, 1280×720 or 1920×1080).
| Score | Level | What to expect when you recover it |
|---|---|---|
| 85–100 | High | The file appears intact; recovery should produce a playable video. |
| 65–84 | Medium | Most data present; video should play with minor issues. |
| 40–64 | Low | Some data may be missing or corrupted; video may have gaps or artifacts. |
| 20–39 | Very low | Significant data loss; recovery may produce partial or unplayable video. |
| 0–19 | Unrecoverable | Critical file structure missing. |
Available scores help you assess the clips found during the free scan; some clips may have no score while assessment is pending.
Real recovery: what a scan actually looks like
This is the real application, not a mockup. Below is the results grid after a direct scan of a Tesla USB drive — every clip the engine found, scored, and tagged, plain and encrypted alike, grouped by event. The total includes clips still on the drive as well as deleted ones, so it is not a count of deleted recordings.

-AI camera labels are guidance, not a guarantee that every frame survived; the Repaired badge marks a clip rebuilt from partially-overwritten data.Two things in that grid are what separate a Tesla-aware scan from a generic carve:
Scores set expectations before you spend a recovery. Most clips here show 95%, while one repaired clip shows 4%. The score is computed from seven weighted factors per clip, so you can tell which footage is likely to be usable up front instead of recovering blind — but treat it as guidance: repair outcomes vary, and footage that was fully overwritten cannot be recovered.
Filenames may be missing even when footage survives. Where filenames have been overwritten, the on-device classifier estimates the camera position. The -AI badge identifies these estimates.
Step-by-step recovery with ClipSalvage
You don't need to be technical. Plug the drive in, press scan, and pick the clips you want back. The eight steps below follow the Pro recovery video above.
Scan the drive directly — no imaging required
ClipSalvage reads the USB drive in place. Plug it in, click Scan USB Directly, pick your Tesla partition — that's the whole setup. A direct scan needs the drive to stay connected and cannot be paused, and the app recommends a disk image if you expect to scan more than once. Already have a disk image of the drive? Open that instead.
macOS
Requires Full Disk Access permission. Go to System Settings → Privacy & Security → Full Disk Access and add ClipSalvage. Required for direct scanning.
Windows
Run as Administrator is required for raw disk access. Right-click the app → "Run as administrator." Needed for direct scanning via \\.\PhysicalDriveN.
Stop using the USB drive
The moment you realize footage is missing, stop writing new data to the drive. Every new file written increases the chance of overwriting recoverable data. Do not let Tesla continue recording to the drive, and keep a separate drive ready for the recovered files.
Download ClipSalvage
Get the app from clipsalvage.com for macOS or Windows. Installation is straightforward — no special configuration needed. Thumbnail decoding is native and in-process — no FFmpeg or separate media install needed.
Choose Scan USB Directly and read the warning
Open ClipSalvage and click Scan USB Directly in the sidebar. Read the warning before continuing: a disk image is recommended for repeated scans, and a direct scan needs the USB to stay connected and cannot be paused. To scan the drive itself, choose Continue Anyway.
Drive showing read errors, mounting intermittently, or "needs formatting"? If you already have a disk image, open it instead and keep the original safe. Supported image formats: .img, .raw, .dd, .dmg.
Select the right partition
Select your Tesla USB or its Tesla partition. Check the name and size so you do not scan the wrong disk, then click Scan Drive.

Leave it connected through the scan and the checks
The engine reads the drive in place and streams recoverable clips to the project as it finds them — no image file needed. You will see real-time progress showing clips found, data processed and recent activity. Memory usage stays constant regardless of drive size because clips are streamed directly to the project database as they are found. On a Mac, the volume may disappear from Finder while the raw scan runs, then return afterwards. Finding clips is only the first stage: ClipSalvage then generates previews and checks encrypted footage, so leave the source connected until the results appear.
Asked to sign in to Tesla? If the scan finds encrypted footage, ClipSalvage may ask you to sign in to Tesla before it can check those clips. Complete that step in the app; the login window is Tesla's own.

Review results
The results show every clip the scan found — existing footage as well as deleted clips, so the total is not a count of deleted recordings. Use the dates, thumbnails and grouped camera views to find what matters to you. Assessed clips can show a score (0–100), camera position and file size; double-click any clip to see detailed metadata including the confidence score breakdown by all seven factors. Where the original Tesla filename survives on the drive, the camera position is read from that directly; where the filename has been overwritten, an on-device AI vision model estimates the camera from the clip itself and tags the thumbnail with an AI badge so you can audit provenance. Repaired marks reconstructed footage. Treat labels and percentages as guidance, not proof that every frame is intact.
Select your clips and click Recover
Click the clips you want and check the selection count, then click Recover at the top of the window. Choose a folder on another drive — never the Tesla USB you are recovering from, because saving back to the source could overwrite footage you still need. The app writes the video files out without re-encoding. A clip whose index was damaged is saved with a rebuilt index so it plays; the app labels those clips Repaired, and Timing estimated when playback timing had to be estimated. Clips are organized back into Tesla's own folder layout (TeslaCam/SavedClips/<event>/, SentryClips/<event>/, RecentClips/) so you can drop the output folder straight into a Tesla dashcam viewer.
Watching them afterwards. An intact recovered clip is the original file, so its telemetry comes back with it, and the output keeps Tesla's folder layout — it opens in any Tesla dashcam viewer. Sentry Clip Viewer is ours: six cameras in sync, consecutive clips joined into one continuous video, a Tesla-style telemetry HUD, and five export modes up to 4K ProRes. iPhone, iPad and Mac, $6.99 one-time.

Check and back up before reusing the USB
Wait for the confirmation and check how many clips succeeded. Open the saved files and review the footage. Keep the original drive safe until you have checked and backed up your results — only then erase it or put it back in the car.

Encrypted clips: how decryption works
Since v2.20.0, ClipSalvage recovers and decrypts Tesla's encrypted Sentry Mode and Dashcam clips. On supported vehicles — those with the AMD Ryzen infotainment computer (Model 3, Model Y, the refreshed Model S and Model X, Cybertruck) — Tesla encrypts each new clip on the USB drive by default — since software 2026.20 and in every release since, as a per-file encrypted container, with the decryption keys held by Tesla and released only to an authenticated Tesla sign-in. Here is how ClipSalvage handles them, end to end:

Scan as usual
ClipSalvage finds both plain MP4 clips and encrypted clip containers on the drive — deleted, formatted, or corrupted alike.
View available previews
View available thumbnails and recovery assessments. Assessments help select footage to export and check; some thumbnails or scores may be unavailable.
Sign in to Tesla when asked
Video processing runs on your computer; footage, thumbnails and disk contents are not uploaded. Encrypted clips may need Tesla sign-in for missing keys; license activation and verification need internet access.
Keys are kept locally
Fetched keys are stored on your computer, so re-scans and exports of the same clips do not need to request them again.
Automatic repair
Recover surviving footage from partly overwritten clips. Results depend on the video data that remains; overwritten footage cannot be recreated. Free and Pro use the same repair capabilities.
Export
Save the decrypted, repaired MP4s to a folder on another drive, and check them before you reuse the USB.
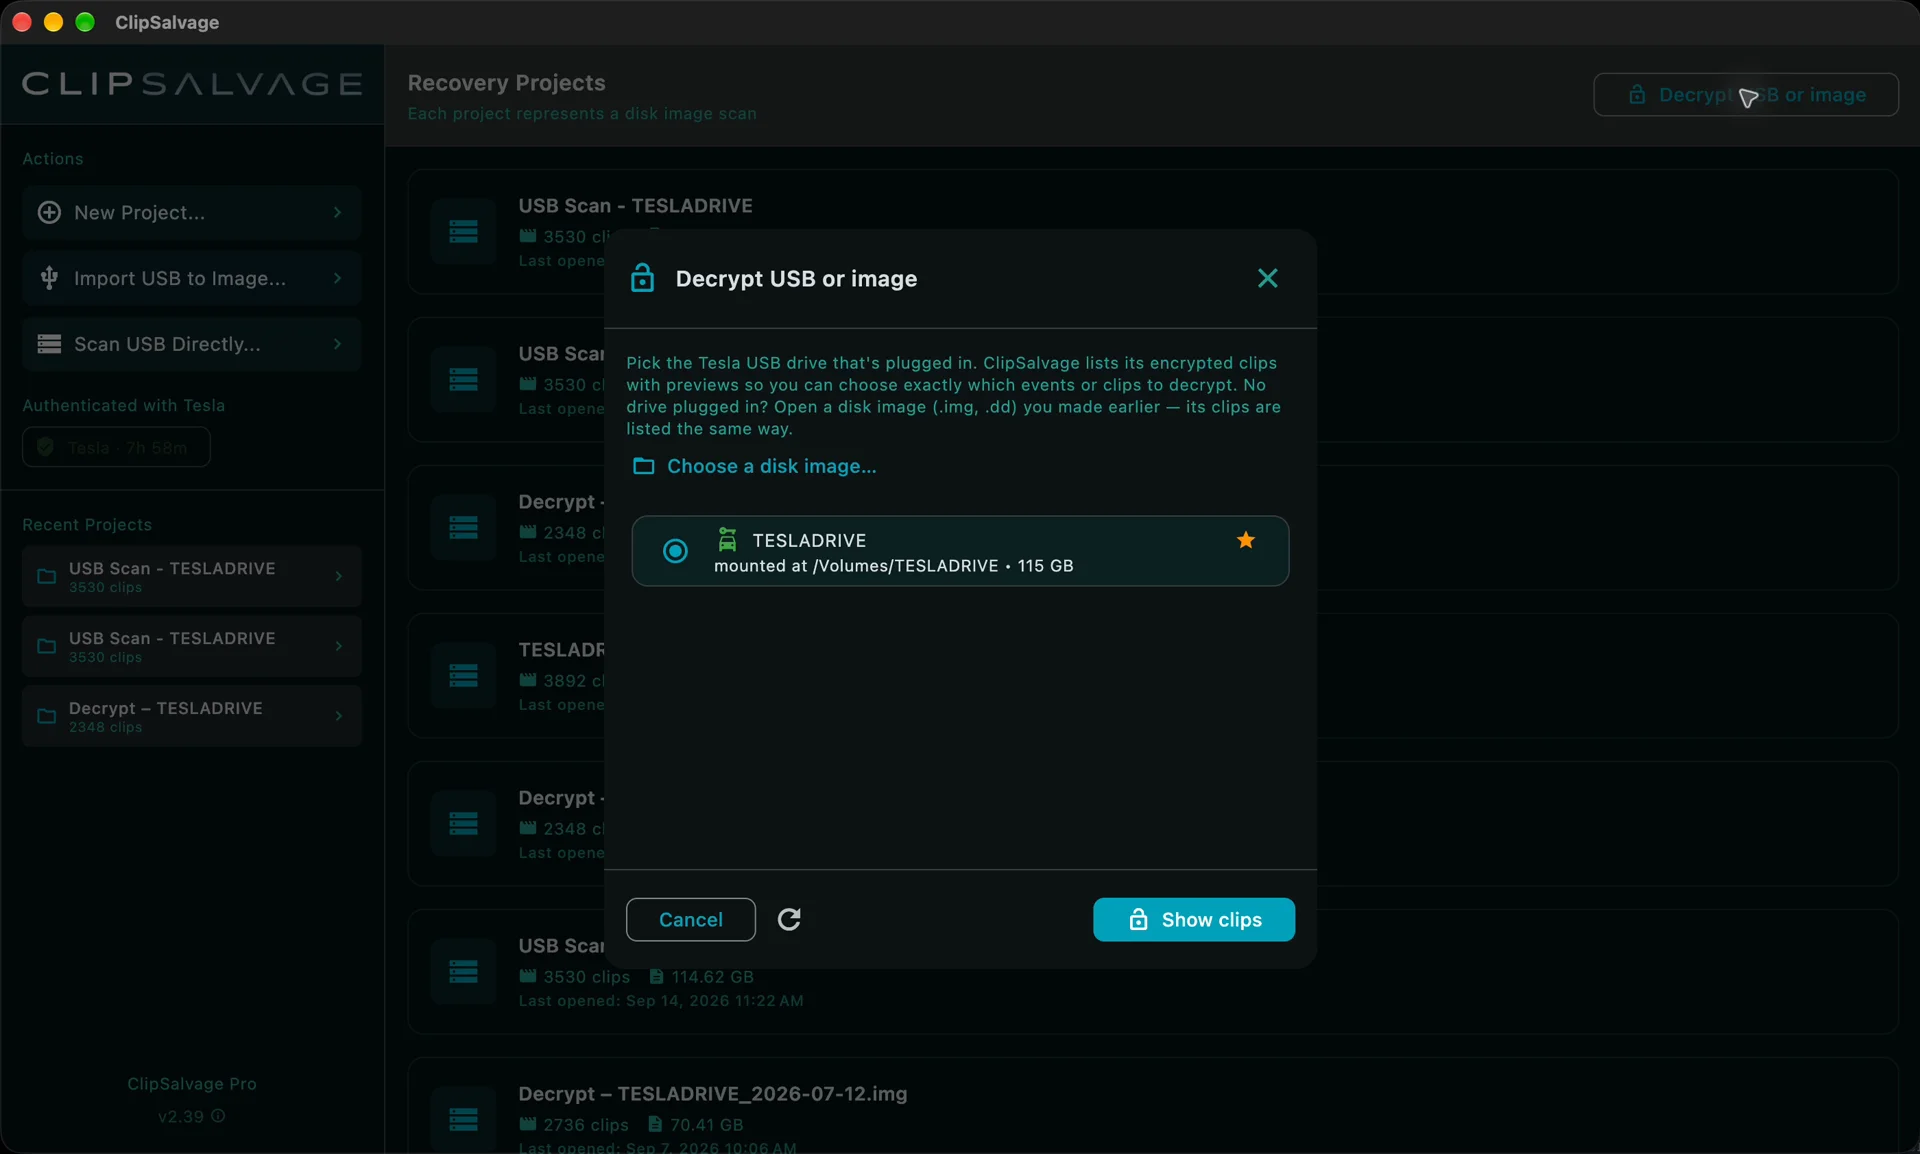

Video processing runs on your computer; footage, thumbnails and disk contents are not uploaded. Encrypted clips may need Tesla sign-in for missing keys; license activation and verification need internet access. For the full background on Tesla's clip encryption, see Tesla dashcam encryption: what it means for recovery. If the clips you want were already deleted or lost to a format, recovering a deleted clip that was encrypted covers what is still possible — and why TestDisk and PhotoRec cannot decrypt them.
What are the alternative recovery methods?
ClipSalvage is one of several options for recovering Tesla dashcam footage, and the only one of these built specifically for it — it is also the only option in this comparison that decrypts Tesla's encrypted clips. The right choice depends on your technical comfort level, budget, whether your clips are encrypted, and your specific situation. Here is an honest comparison of the alternatives. ClipSalvage's free scan shows available thumbnails and recovery assessments. Assessments help select footage to export and check; some thumbnails or scores may be unavailable. Existing clips export free when no repair is needed, and deleted and repaired clips share 3 free recovery exports. ClipSalvage Pro, a one-time purchase, adds unlimited recovery exports. Decrypting existing encrypted clips is free and unlimited. No time limit; repeat recovery exports count toward the allowance.
TestDisk / PhotoRec (free, open source)
PhotoRec is a free, general-purpose file carver that can recover unencrypted MP4 files. It determines the filesystem block or cluster size, then reads the media block by block. QPhotoRec provides an official graphical interface; the Windows download includes it, while the official macOS instructions describe running PhotoRec in Terminal. PhotoRec does not provide Tesla-specific camera identification, confidence scoring, or filename recovery from directory entries. It cannot decrypt Tesla's encrypted clips. Download from CGSecurity's PhotoRec documentation and launch instructions.
Professional data recovery services
If your USB drive has physical damage (not recognized by any computer, clicking sounds, etc.), a professional lab with cleanroom facilities may be able to recover data directly from the flash storage chips. This is expensive and time-consuming (typically 1-4 weeks) but is the only option for physically damaged drives. For logical recovery (formatting, deletion, corruption), software tools are typically sufficient at a fraction of the cost.
General-purpose recovery software
Many data recovery tools (e.g. Recuva, Disk Drill, EaseUS, R-Studio)* can recover MP4 files from USB drives. These tools are designed for broad file recovery across many file types and use cases. They typically treat Tesla videos the same as any other MP4 file — without Tesla-specific features like camera position identification, Sentry event grouping, or Tesla filename recovery. None of them decrypt Tesla's encrypted clips — the decryption keys are held by Tesla and released only to an authenticated Tesla sign-in. On a formatted drive they may not surface encrypted clips at all: signature-based carving looks for the MP4 header that marks the start of a video file, and an encrypted clip does not have one — the header is encrypted along with the video. They are a reasonable choice if you also need to recover non-video files from the same drive.
How can you prevent Tesla dashcam data loss?
A few simple habits make it far less likely you'll lose footage when you need it most.
- Use a high-endurance USB drive. Samsung, SanDisk, and Kingston make drives rated for continuous write cycles. Tesla's constant recording wears out standard USB drives quickly.
- Create regular backups. Periodically copy the TeslaCam folder to your computer. Some Tesla owners do this weekly or after any notable Sentry event.
- Use two USB drives in rotation. While one is in the car, you can back up the other at home.
- Do not remove the drive while the car is on. Always use the dashcam icon on the Tesla touchscreen to stop recording before physically removing the USB drive.
- Check drive health. If your Tesla starts showing "USB drive too slow" warnings, the drive may be failing. Back up immediately and replace it.
- Enable Sentry Mode clip saving. When Tesla notifies you of a Sentry event, tap "Save" immediately. This moves the clip from RecentClips (which gets overwritten) to SavedClips (which is preserved until you delete it).
Sources & references
- ISO/IEC 14496-12:2022 — ISO base media file format (the MP4 /
ftyp/moov/mdatatom structure file carving relies on) - Microsoft exFAT file system specification (cluster size, allocation, and directory-entry layout on Tesla USB drives)
- NIST SP 800-88 Rev. 1 — Guidelines for Media Sanitization (why a quick format leaves the underlying data intact until it is overwritten)
- Tesla owner's manual — Dashcam & Sentry Mode storage